Simon Say Stamp’s Wednesday Challenge this week is to make your own background. So I made several card fronts using four colors of Martha Stewart acrylic paint. I wanted a variation of pearl, silver, aqua, and minty green. I then used the dried card fronts to make three Christmas cards. I’m having so much fun playing with my Christmas toys that I’m not ready to stop making Christmas cards yet. The card supplies are listed in each photo caption. Hope you got some crafty time in this weekend!
This card uses Birch Press Design’s Glitz Snowflake Layer Die set and Simon Says Stamp’s Abstract Holiday stamp set. I cut the snowflake layers from vellum, soft stone, white cardstock. The sentiment was heat embossed on soft stone cardstock.
The joy die cut was cut from foil and aqua cardstock using Memory Box’s Joy Airy Script die. The sentiment was heat embossed on soft stone cardstock using Simon Says Stamp’s Abstract Holiday stamp set. The snowflakes were hot foiled on the painted background using Spellbinders’ Elegant Circle Glorious Glimmer Hot Foil Plate.
Hero Arts Wish Ornament Die was used to die-cut the ornament from white glossy, silver glitter, and aqua cardstock. Wink of Stella was applied to the bow for some added shimmer.
The following cards were inspired by Hero Arts’ Stay Crafty with Hero Challenge #19 to include a heart and Simon Says Stamp’s Wednesday Challenge to layer it up. My main focal point of the cards was Hero Arts Renaissance Heart Die. It’s a beautiful die and I used it to create die cuts and to make an impression on the card front. The cards are shown below along with the supply lists in the photo captions. Hope you are able to get some crafty time in this weekend!
Using pink watercolors, I combined various colors of pink watercolors on watercolor cardstock and let it dry before die cutting the heart from it using Hero Arts’ Renaissance Heart die. The white card base was sprayed with gold spritz/spray and left to dry. The be mine sentiment was die cut from cardstock using Penny Black’s Be Mine die and then heat embossed with gold tinsel embossing powder. The card was assembled by attaching the heart die-cut to the card base, a strip of tracing paper was stapled to the card base, and the be mine die-cut was glued to the tracing paper.
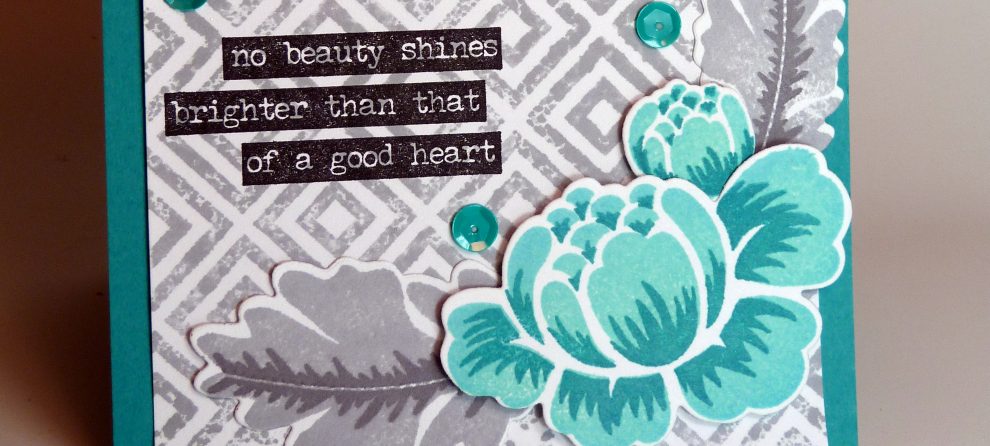
Hero Arts’ Renaissance Heart die was used to emboss the gray cardstock. The love die-cut was cut from some watercolor washed cardstock using Papertrey’s Wet Paint love die. The You Always sentiment from Papertrey’s Wet Paint stamp set was stamped on a thin strip of pink cardstock. The heart impression gives the look of an added layer without adding additional cardstock.
The gold heart die-cut was cut from gold shimmer cardstock using Hero Arts’ Renaissance Heart die. The banner was die cut from ivory cardstock using Simon Says Stamp’s Tilted Banners die and stamped with Happily ever after from Papertrey’s Love Lives Here stamp set. The sentiment was attached to the heart die-cut and then attached to a layer of ivory and gold shimmer cardstock and then attached to an ivory cardstock card base. The edges of the upper square card front were distressed for some texture.
I combined Ink to Paper’s Melissa’s Fab Friday Challenge of creating a heart card with Simon Says Stamp’s Monday Challenge to create a shaker card. I find shaker cards hard work so I look for ways to make it easy like using dies to create the shaker frame. I know it’s an old die, but Papertrey’s Cover Plate: Heart die works great for creating heart windows to use in a shaker card. I used a few of the die-cut hearts on a goodie bag to use to give some candy with the card. Supplies are listed in the photo caption. Happy crafting!
The card is made using Papertrey’s Cover Plate: Heart die to cut the card front cardstock and fun foam. I used red cardstock as the background for the back of the shaker card so attached it to the prepared fun foam layer and added some gold seed beads to each heart window. I then heat embossed the sentiment from Papertrey’s Falling Leaves stamp set in gold embossing powder on the prepared card front. I thought the sentiment falling for you goes perfect with a shaker card. I then wound gold twine around the card and assembled the card, carefully aligning the heart windows. The cute goodie bag was made using Papertrey’s Favor It Box #3 Die.
Gina K’s January Monthly Mix Challenge is to “Put your red dress on” and use red as the dominant color and make a celebratory card. I made three birthday cards/tags each with a different style. Cards supplies are listed in the photo caption. Happy crafting!
The red card front was stamped with Gina K’s Background Diagonal Stripe stamp. The edges of the red panel were sponged with distress ink to fade out the diagonal pattern. I die cut the square panel from white cardstock using Spellbinders’ Large Square die set. This is my first attempt at wreath building and I used leaf images from Gina K’s Sketched Wreath Builder and Holiday Tapestry stamp sets. I heat embossed the birthday sentiment from Gina K’s Sketched Wreath Builder stamp set. The last bit after assembling the card was to add some gems to the wreath.
I used snowflake stamps from Gina K’s Joy of the Season and Snowflake Cascade stamp sets to heat emboss the images around the border of the card front. I wet washed the prepared card front and watercolored the front with distress ink. It’s a bit hard to see in the photo but there is some abandoned coral and picked raspberry along the edges of the card. I cut a tag out of vellum using the medium tag die from Gina K’s Tag Trio die set. I stamped the birthday sentiment from Gina K’s Winter Hugs stamp set and heat embossed it. I assembled the card and added a twine bow to the tag.
The last one is a wine bottle tag using the largest die from Gina K’s Tag Trio die set. I lined up and glued down strips of various reddish colored cardstock on a scrap piece of cardstock and then die cut the tag. I also die cut 2 snowflakes using Gina K’s Snowflake Trio die set. I heat embossed the snowflakes with sparkle embossing powder. I heat embossed the gift for you sentiment from Gina K’s Holiday Tapestry stamp set on the prepared tag. Then I glued the snowflakes down on the prepared tag and trimmed off the excess. I stamped the back with the birthday sentiment from Winter Hugs. The last thing was to add the twine to make a loop to put over a wine bottle and add a bow at the top of the tag.
I bought myself some craft goodies for Christmas this year and am happy to be using them for the current Simon Say Stamps’ Monday and Wednesday Challenges to use something new! I wanted to make some New Year’s cards since I completely missed sending out any Christmas cards. My new supplies included Gina K’s Stellar Snowflake Stencil, Simon Says Stamp’s Holiday Sparkle Greetings stamp set, Pinkfresh’s Phrase Builder Happy Holidays die set, and Renke’s Cocktails Stencil. Card supplies are listed in each photo caption.
I used Gina K’s beautiful Stellar Snowflake Stencil to create the deep purplish-blue snowflake. I heat embossed the Peace sentiment from Simon Says Stamps’ gorgeous Holiday Sparkle Greetings stamp set and fussy cut the sentiment out. I splattered the card front with a pearlescent watercolor and added some sparkly gems. Then I let the card sit there for a few days before I decided it really needed a Wishing You sentiment to go with the peace sentiment since I was wanting to send it for best wishes in 2021. So I heat embossed the Wishing You sentiment from Gina K’s Winter Hugs stamp set.
See caption above for card supplies.
I used Gina K’s Stellar Snowflake Stencil to ink two purple snowflakes in opposite corners of the card front. I heat embossed the Joy sentiment from Simon Says Stamps’ Holiday Sparkle Greetings stamp set and fussy cut the sentiment out. I splattered the card front with a pearlescent and purple watercolor and added some sparkly gems for more sparkle. I added the Wishing You sentiment from Gina K’s Winter Hugs stamp set to go with the joy sentiment.
For this card, I used Gina K’s Stellar Snowflake Stencil to ink purple snowflakes along all sides of the card front. I die cut Happy New Year from Pinkfresh’s Phrase Builder Happy Holidays set from white and silver cardstock and attached it to the card with foam tape. Lastly, added some gems for some sparkle.
For my final card, I used Renke’s Cocktails Stencil to create a background of cocktails on some Simple Stories patterned paper. After the paste had dried and I had attached it to a card front, I die cut Happy New Year using Pinkfresh’s Phrase Builder Happy Holidays from black cardstock. I coated the die cut with a layer of clear Wink of Stella before attaching it to the prepared card.
Simon Says Stamp’s Monday and Wednesday Challenges are both to use a new product. I went a bit crazy with buying myself crafty Christmas presents. One of my favorite new items is the beautiful Memory Box Collage die set that includes the Evergreen Sky, Lamplight Tree, Tall Fir, and Small Pine Tree dies. It makes for such a pretty winter scene! Card supplies are listed in the photo caption. Hope you can start 2021 off right and get some crafty time in!
I used the Memory Box’s Evergreen Sky Collage, Lamplight Tree Collage, Tall Fir Collage, and Small Pine Tree Collage dies to make this dimensional card. I originally cut all of the layers from white cardstock but wanted more drama so ended up coloring the layers with Copics. The benefit with doing it this way is that I could the range of color saturation but still use a consistent color tint. I assembled the layers with foam tape to get more dimension, sprinkled pearlescent watercolor over assembled product. The last step was to die cut a banner from black cardstock using Simon Says Small Folded Banners die and stamp the warmest wishes sentiment from Papertrey’s Cup of Cheer stamp set.
Gina K’s January Monthly Mix Challenge is to “Put your red dress on” and use red as the dominant color and make a celebratory card. I was struggling with using red and not have it feel like a Christmas card. I ended up pulling out my Inspiring Poppies stamp set to make a set of three birthday cards. I love how the sentiment from Gina K’s Wealth of Wishes worked perfectly with the poppy image. I wanted them to feel different even though I was using the same Gina K stamp sets. I’m going in the order that I crafted them and you can see that they get more toward the clean and simple look after coloring so many poppies. Supplies used in the card are noted in the photo caption. Hope your 2021 is starting off with some time to craft!
The card was made by stamping the poppy image from Gina K’s Inspiring Poppies stamp set multiple times across the card front and coloring them with Copics. I then stamped the birthday sentiment from Gina K’s Wealth of Wishes stamp set on the card base and heat embossed it with firecracker red embossing powder. I added a strip of red foil cardstock along the bottom of the card front before attaching it with dimensional foam tape to the card base. The last step was to color the poppies with a layer of clear Wink of Stella.The card was made by stamping the poppy image from Gina K’s Inspiring Poppies stamp set multiple times across the bottom of the card base and coloring them with Luminance colored pencils. I then cut the plain white card front at an angle and stamped the birthday sentiment from Gina K’s Wealth of Wishes stamp set across the angled portion. I added a strip of black cardstock along the angled card front before attaching it with dimensional foam tape to the card base. The last step was to color the poppies with a layer of clear Wink of Stella and adding gems for some sparkle. I stamped a single image of the poppies from Gina K’s Inspiring Poppies stamp set on the card base and colored them with Copics. I stamped the birthday sentiment from Gina K’s Wealth of Wishes stamp set on white cardstock and created a sentiment strip attached it to the card base with dimensional foam tape. The last step was to color the poppies with a layer of clear Wink of Stella and adding gems for some sparkle.
I combined Simon Says Stamp’s Monday Celebrate Challenge and Simon Says Stamp’s Sparkle and Shine Challenge with Gina K’s December Monthly Mix Challenge to make four cards for these challenges. Gina K’s December Monthly Mix Challenge is to use a line from the Tic Tac Toe board below to make a card. The easiest part of these combined challenges was making Christmas themed celebration cards and adding sparkle and shine to my cards since I seem to add sparkle and shine elements in every card. I previously blogged about the two cards I made for Gina K”s challenge in this post. The cards/tags are presented in the order of my most favorite to least favorite. Cards supplies are listed below each card photo. Hope you are having a good December and getting some time to craft!
I was inspired by Gina’s video talking about how pretty gold embossing is on gold cardstock so I wanted to make a card using green glittery embossing powder on green cardstock. My Instagram post shows another view of this card from a different angle so you can see the sparkly embossing powder better. The stamp is from Gina K’s Christmas Silhouettes stamp set and the sentiment is from Gina K’s Sparkle and Shine stamp set. I sponged Mowed Lawn distress ink around the edge of the card front. The edges of the matching green card base was swiped with embossing ink pad and gold embossed for a bit of extra sparkle. The sentiment was stamped on a strip of vellum. The circles take the shape of metallic pearls on the Christmas tree. The tic tac toe line is circle, heat embossed, and vellum. As I type this, I realize the pearls don’t match the description for circle since they aren’t stamped or die cut. Whoops! The tic tac toe line for this tag is to use vellum, ink blending, and tag. The ink blending was used on the poinsettia stamping where I used Festive Berries and Black Soot oxide ink to create a darker shade at the center of the poinsettias. The tag was die cut using Gina K’s Tag Trio die set. The poinsettia and leaf images are from Gina K’s Christmas Silhouettes stamps set. The to and from sentiment are from Gina K’s Holiday Tapestry stamp set. The white cardstock base layer was embossed after it was die cut using Simon Says Stamp’s Lumen embossing folder. Added a few clear rhinestones and glittery red twine for some sparkle.This card was made following the top line of the tic tac toe board, circle die cut, created patterned paper, and emboss resist. This card uses Gina K’s Holiday Tapestry stamp set to create the patterned paper and Ornamental Snowflakes for the sentiment. The circle die cut uses Simon Says Stamps Stitched Circles dies. Added clear wink of Stella on the stitched circle frame, clear rhinestones, and sparkly twine for added sparkle.I used the bottom line of the tic tac toe board, vellum, ink blending, and tag, on this tag. The ink blending is on the base layer of the tag and used festive berries, fired brick, and black soot oxide inks. The top vellum layer was stamped with poinsettias from Gina K’s Holiday Silhouettes stamp set. The to and from sentiment are from the Holiday Tapestry stamp set. I originally started with the clear embossing powder on the flowers for a smooth shine but when I went to gold emboss the sentiment, the flecks of gold embossing stuck to the poinsettia image. I went with it and added a center of gold to the poinsettia images. Tag was finished off with some gold twine.
I made two cards that combine the themes for Simon Says Stamp’s Wednesday Challenge – Christmas Critters with Simon Says Stamp’s Monday Challenge – Ice Cold. The first one came together quickly since I was using die cuts and patterned papers to create the card. The glittered hillside die cuts add lots of icy sparkle. The second card used the same type of icy hillsides but with a Yeti for the Christmas Critter. Hope you get some time to craft during the holiday season! Supplies for the cards are listed in the captions.
The background is sheet from Papertrey’s Holiday Folk Paper Pack and the tree and bear were fussy cut from sheets of the same paper pack. The sparkly hillside die cuts were created using Papertrey’s In the Meadow Collection dies on adhesive sheets that are coated with a layer of coarse glitter. The Merry Christmas sentiment was created with Papertrey’s Christmas Cheer stamp and die set.I love this happy Yeti image! Those teeth and that face just make me smile and we all need more reasons to smile! The Yeti image and sentiment are from My Favorite Things Beast Friends stamp set. The Yeti is colored using Copic markers. The trees are from a Craft Smart rubber stamp from Michaels. The glittered hillside adhesive sheets were created using Papertrey’s In the Meadow Collection dies.
I was inspired by the white textured background with the bright pop of color from the cardinal. I used embossing folders to create a similar textured background for my cards. For my first card, I used stickles to make icy branches for the cardinal to rest on and be surrounded by. For the second card, I used white shimmer cardstock for a ice cold backdrop for the cardinal, a bit more subtle style when compared to the first. I was really happy with how the cards turned out! Hope you get some time to craft during the holiday season! Supplies for each card are listed in the captions.
My card for Simon Says Stamp’s Icy Cold Monday Challenge, Simon Says Stamp’s Christmas Critters Wednesday Challenge, and Stay Crafty with Hero Arts Challenge. The card uses Hero Arts Color Layering Cardinal stamp and die sets to create the beautiful cardinal and Papertrey’s Vintage Ornaments II stamp set for the sentiment. The pine twigs were die cut using Memory Box’s Pine Twig die. The twigs were coated with stardust stickles. The white background was created using the Stampin Up’s Softly Falling embossing folder.
I used Curious Metallics’ Ice Gold shimmer cardstock and embossed it using Carta Bella’s Christmas Delivery embossing folder for the card front. It makes a beautiful ice background scene. The cardinal was created using Hero Arts’ Color Layering Cardinal stamps and dies. The sentiment was stamped using Papertrey’s Vintage Ornaments II stamp set and Ranger’s gold tinsel embossing powder on a velum strip. The twig wreath was created using Hero Arts Branch Wreath Fancy die that was decorated with red pearls.
All content, including text, photographs, and samples are copyright 2010 through 2019 by Kristie Hartfeil. They are shared here for your personal, non-commercial use, this includes contests, submissions, and publications. Any other use requires my written permission. Thank you.